hello beauties,
I'll confess one thing to you, when Katty told me that she was going to make a card for #tutoThursday I was a little embarrassed... Like, I like that every Thursday you freak it out and maybe a card is not much... But that was because I had not seen ANYTHING of the project that we show you today. Oh mother, what a great job something so small can hide! Something tells me you're going to love it so stick around...
Hello to tod@s!!!
After a very intense summer (with a wedding included), here I "get back on track" and continue to get the most out of the INDIGO ROCKS collection!!!
Those of you who know me know that I love postcards and in fact I have prepared several tutorials with very different and original formats for Cocoloko.
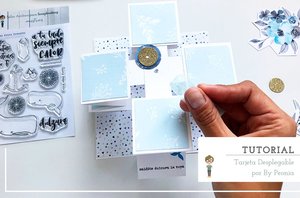
Well, today I bring you a totally card-like #tutoThursday, it's a postcard in accordion format, which you can customize to your liking completely.
Let's go to the mess!
Materials:
– Papers from the Indigo Rocks collection
– Stamps from the Just Love set
– Die cuts from the Indigo Rocks collection
– Basic cut and paste
– Pencil and ruler
– Thin ribbon (organza or fabric)
– Versafine type ink
– Base for Cocoloko stamps

Instructions:
1. For the structure of our accordion postcard you have to cut:
– 4 pieces of scrap paper (I used a white base, but it is your choice) measuring 40cm x 5cm
– 16 pieces of paper from the Indigo Rocks collection, measuring: 4.5cm x 4.5cm
– 1 piece of paper from the stack of Indigo Rocks papers printed on 1 side, measuring 15cm x 15cm
– 1 piece of plain paper, measuring 15.5cm x 15.5cm
– 2 pieces of basic paper, in my case, white, measuring: 2.5cm x 8cm
* In the 4 pieces/strips of 40cm x 5cm scrap paper, we will make marks every 5cm, so that it will look like in the photo. We will also hook the 4.5cm x 4.5cm pieces as a frame. I have left the squares in the middle of the strip "blank" because it is where I will decorate my postcard.

2. We will take one of the papers with cards to cut out, from the Indigo Rocks 15 x 15cm stack of papers:

3. I have arranged the 4 strips with the frames attached and the cards that I have cut out and with which we will decorate the central part of the postcard.

** I have used the stamps "damn sweetness of yours" and "you are my favorite fruit" from the stamp set "Just Love" and "Monsters" respectively, and I have stamped them on my postcard, it looks like this:

4. Now we are going to assemble our 4 pieces on the base:
– In each of the 4 pieces/strips, there is a white square at the bottom of the undecorated strip, as seen in the photo. Well, in each square we will make a mark in the horizontal half, that is, at 2.5cm

We will turn our piece of 15cm x 15cm (which in my case is the paper with colored triangles). We will mark a cross in the middle of this piece, that is, 7.5cm from each side. Once we have the marks made as in the photo, we will center the strips and hook them, as seen in the photo:

It will look like this:

You turn it around and then you will have the structure almost done. At this point you have to hook the 15.5cm x 15.5cm piece to the base, to reinforce it.

5. Now we are going to polish and finish off our accordion postcard. Take the 2 pieces of 2.5cm x 8cm and glue them in the shape of a cross, draw a dot in the center and make a hole with the crop a dile or with an awl:

6. Center the two pieces with the postcard (I have done it by eye and it turned out well, for the most purists, you can use a ruler and pencil and mark the middles of each piece) and all that remains is to hook them.

7. The final step is to pass the organza strip through the hole we have made. I put a circular die-cut of 2.5cm in diameter, which is very cool.

And stud!!! This is how the accordion card looks. Although it is a card that takes some work, the result is totally worth it.


